My First Kaggle Submission Using Pytorch ( Facial Keypoints Detection )
Although I did some deep learning before in my undergraduate, but never participated in a Kaggle competition. After started working at TigerIT on Face Recognition system, I thought why not try an easy image related problem in Kaggle!
Problem
Here is the problem link. It is an old problem. To solve this problem I needed the basic knowledge of how to write Pytorch model, what is CNN ( Convolution Neural Network ), Resnet ( A famous CNN architecture ) and transfer learning. After downloading the dataset, there were four files.

The traning set has 7049 images of dimension 96 x 96. Test set has 1783 images of same dimension. Each image has 30 features, left_eye_center_x, left_eye_center_y, nose_tip_x, nose_tip_y etc. So my model input will be 96 x 96 input and model output will be 30 features. Training and Test data are given as CSV file. I need to submit another CSV file which should contain two column TestId ( image ID from Test file, 1-based indexing ) and Location ( x or y co-ordinate of some features ) and total 27124 rows of data. For each test image, which features location need to be submitted is given in IdLookupTable.csv file and submission file format is given in SampleSubmission.csv file.
Solution
Now let’s get started to the solution part. I have sub divided each steps.
Importing Components
These are the tools I used in this notebook.
from torchvision import models
import numpy as np
import pandas as pd
import matplotlib.pyplot as plt
import time
import torch
from torchvision import transforms
from torch.utils.data import Dataset, DataLoader, random_split
import torch.optim as optim
from torch.optim import lr_scheduler
import os
from copy import deepcopy
Exploring The Training Dataset
Loading the data and see data shape.
train_original = pd.read_csv( 'dataset/training/training.csv' )
print(train_original.shape)
print( train_original.head(1) ) # Shows 1st row of data along with column names
This is the training data format:
| left_eye_center_x | left_eye_center_y | right_eye_center_x | right_eye_center_y | left_eye_inner_corner_x | left_eye_inner_corner_y | left_eye_outer_corner_x | left_eye_outer_corner_y | right_eye_inner_corner_x | right_eye_inner_corner_y | right_eye_outer_corner_x | right_eye_outer_corner_y | left_eyebrow_inner_end_x | left_eyebrow_inner_end_y | left_eyebrow_outer_end_x | left_eyebrow_outer_end_y | right_eyebrow_inner_end_x | right_eyebrow_inner_end_y | right_eyebrow_outer_end_x | right_eyebrow_outer_end_y | nose_tip_x | nose_tip_y | mouth_left_corner_x | mouth_left_corner_y | mouth_right_corner_x | mouth_right_corner_y | mouth_center_top_lip_x | mouth_center_top_lip_y | mouth_center_bottom_lip_x | mouth_center_bottom_lip_y | Image |
|---|---|---|---|---|---|---|---|---|---|---|---|---|---|---|---|---|---|---|---|---|---|---|---|---|---|---|---|---|---|---|
| 66.0336 | 39.0023 | 30.227 | 36.4217 | 59.5821 | 39.6474 | 73.1303 | 39.97 | 36.3566 | 37.3894 | 23.4529 | 37.3894 | 56.9533 | 29.0336 | 80.2271 | 32.2281 | 40.2276 | 29.0023 | 16.3564 | 29.6475 | 44.4206 | 57.0668 | 61.1953 | 79.9702 | 28.6145 | 77.389 | 43.3126 | 72.9355 | 43.1307 | 84.4858 | 238 236 23 … |
Now let’s see if the training dataset has any missing column values for any rows. If a row has missing value for any column, I dropped the whole row. This is the easiest way, another way would be interpolating eye center location if eye corner is given, but too much interpolating could train the model in wrong way. Also some features were not interpolatable.
print(train_original.isna().sum()) # for each column show number of rows missing data
train_full = train_original.dropna() # drop the row if any column has null/empty value
print(train_full.shape) # final training dataset
After dropping the empty/null valued rows I was left with 2140 training examples. Now the “train_full” dataframe has both the input image ( in “Image” column ) and output features location ( all other columns ). Although, this state of dataset is workable, I seperated the input and output from “train_full”. Also the images were given as space seperated string of pixel levels in range [0, 255]. So, I normalized them to [0, 1].
x_train = train_full['Image']  #x_train is the input
x_train = np.asarray( [ np.asarray( img.split(), dtype="float32" ).reshape(96,96) for img in x_train ] )
x_train = x_train/255.0
y_train = train_full.drop(columns= 'Image').to_numpy(dtype="float32")  #y_train is the output
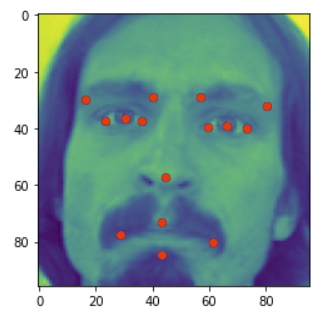
Now I tried to visualize the input using matplotlib along with feature locations. Here is the code
plt.imshow(x_train[0])
for i in range( 0, 30, 2 ):
    plt.plot( y_train[0][i], y_train[0][i+1], 'ro')

Exploring The Test Dataset
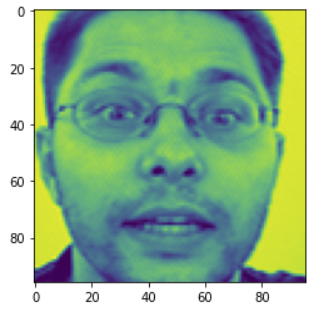
Similar to train dataset but, the test dataset don’t have any features given. My trained model will output the features.
x_test = test['Image']
x_test = np.asarray( [ np.asarray( img.split(), dtype="float32" ).reshape(96,96) for img in x_test ] )
x_test = x_test/255.0
print(x_test.shape)
plt.imshow(x_test[0])

Custom Dataset and Data Loader Using Pytorch
A Custom dataset class is needed to use with Pytorch Data Loader. This Custom Dataset class extends Pytorch’s Dataset Class. Two function is necessary, first one is: given an index, return the input, output ( image, it’s feature vector ) tuple and another function for returning length of the dataset. Here is my Custom Dataset Class.
class CustomDataset(Dataset):
    def __init__(self, x, y):
        self.x = x
        self.y = y

    def __len__(self):
        return len(self.x)

    def __getitem__(self,index):
        img = torch.tensor(self.x[index].reshape(-1, 96, 96))
        label = torch.tensor(self.y[index])
        return img, label  #instead of normalizing image before we could also normalize it here, before returning
I divided the training dataset into 2 parts, training and validating. I could use a seperate test dataset but after deleting null valued rows, my current dataset had a size of only 2140, that is small. Also I could check my model performance with only using validation set. So, I used 90% of the dataset for training and 10% for validating. After dividing the dataset, I put my train dataset and validation dataset into pytorch dataloader using batch size of 32 for training and 64 for validation.
def split_dataset( train_size, dataset ): # train_size is between 0 and 1
    train_len = int(len(dataset)*train_size)
    valid_len = len(dataset) - train_len
    train_ds,valid_ds = random_split(dataset, [train_len, valid_len])

    print(f"total dataset length: {len(dataset)}")
    print( f"train length: {len(train_ds)}" )
    print( f"validation length: {len(valid_ds)}" )

    return train_ds, valid_ds

dataset = CustomDataset(x_train, y_train)
train_ds, valid_ds = split_dataset( 0.9, dataset )
train_dl = DataLoader(train_ds, batch_size = 32, shuffle = True, pin_memory= True)
valid_dl = DataLoader(valid_ds, batch_size = 64)

print( f"train total batch: {len(train_dl)}" )
print( f"validation total batch: {len(valid_dl)}" )
So, the dataset preperation part is done. Now Creating the model and training.
Model Creation
The backbone of my model is a pretrained ResNet18 ( I could also use ResNet34/ResNet50 or higher but training time would increase ). The resnet model accepts 2D image of channel=3. But our input is of channel=1. So I used a convolution layer to increase my channel from 1 to 3. I used 3 x 3 filter with stride=1 and padding=1. Then sent the output of this layer to ResNet18.
The last layer of resnet is a fully connected of from 512 dimension to 1024 dimension. For my purpose I replaced this layer with a fully connected layer of 512 dimension to 384 dimension. Then added another fully connected layer of 384 dimension to 30 dimension for outputting my 30 feature vectors.
I could frozen the weights of all layer in ResNet18 but I decided to further train the weights of ResNet18 using Facial Keypoints Detection dataset. This is my model:
class FacePointModel(torch.nn.Module):
    def __init__(self, freeze_resnet = False):
        super(FacePointModel, self).__init__()

        # Convert 1 filter 3 filter because resnet accepts 3 filter only
        self.conv1 = torch.nn.Conv2d( in_channels=1, out_channels=3, kernel_size=(3, 3), stride=1, padding=1, padding_mode='zeros' )

        # Resnet Architecture
        self.resnet18 = models.resnet18(pretrained=True)
        if freeze_resnet:
            for param in self.resnet18.parameters():
                param.requires_grad = False
        # replacing last layer of resnet
        # by default requires_grad in a layer is True
        self.resnet18.fc = torch.nn.Linear(self.resnet18.fc.in_features, 384)

        self.relu = torch.nn.ReLU()
        self.linear1 = torch.nn.Linear(384, 30)

    def forward(self, x):
        y0 = self.conv1(x)
        y1 = self.resnet18(y0)
        y_relu = self.relu(y1)
        y_pred = self.linear1(y_relu)
        return y_pred
Early Stopping
Let’s say I have started my training for 200 epoch, but after 60 epoch there was no improvement in validation set. For these kind of case I used early stopping, given patience, if my model does not improve for patience epoch at a strech, it stops the training. I also used my early stopping class for saving my model weights and biases. This is the implementation:
class EarlyStopping:
    def __init__(self, save_path = "./checkpoint/", patience= 20, save_each_model = False):
        self.best_score = None
        self.save_path = save_path
        self.patience = patience
        self.counter = 0
        self.save_each_model = save_each_model
        self.epoch_count = 0
        if not os.path.exists(save_path):
            os.makedirs(save_path)

    def update_save_model( self, valid_loss, model ):
        self.epoch_count += 1
        #print( f"After Epoch: {self.epoch_count} loss: {valid_loss}" )
        if self.save_each_model:
            model_name = 'saved_model_' + str(self.epoch_count) + '.pt'
            self.save_checkpoint( valid_loss, model, model_name )

        if self.best_score is None:
            print(f"After Epoch: {self.epoch_count}, saving best model .... ")
            self.best_score = valid_loss
        elif self.best_score > valid_loss:
            print(f"After Epoch: {self.epoch_count}, saving best model .... ")
            self.best_score = valid_loss
            model_name = 'best_model.pt'
            self.save_checkpoint( valid_loss, model, model_name )
            self.counter = 0
        else:
            self.counter += 1
            if self.counter > self.patience:
                print( f"Early stopping after epoch {self.epoch_count}, with patience {self.patience}" )
                return True
        return False

    def save_checkpoint(self, valid_loss, model, model_name):
        path = self.save_path + model_name
        torch.save(deepcopy(model.state_dict()), path)
Training
Now the training part. The Kaggle website already said that they will be using RMSE loss to score each submission. So I used pytorch builtin MSELoss class as my loss function ( also known as criterion ).
For optimizer, I used Adam. I also tried SGD optimizer but Adam gave better result. To balance my learning rate ( ie. reducing ) I used StepLR as Learning Rate Scheduler that reduces my optimizer’s learning rate after specific epochs. This is the code I used:
def fit( epochs, model, train_dl, valid_dl, criterion, optimizer, scheduler, device = None ):
    if device is None:
        device = 'cuda' if torch.cuda.is_available() else 'cpu'
    model = model.to(device)
    early_stopping = EarlyStopping()
    loss_train = []
    loss_valid = []
    for epoch in range(epochs):
        print(f"{epoch}/{epochs}:")
        total_train_loss = 0
        total_valid_loss = 0
        model.train()
        for image, label in train_dl:
            image, label = image.to(device), label.to(device)
            out = model(image)
            loss = criterion(out, label)
            # calculate gradient
            loss.backward()
            # Update weights
            optimizer.step()
            # Make gradient = 0 for next batch
            optimizer.zero_grad()
            # detach gradient from loss to save gpu memory
            total_train_loss += loss.detach()

        model.eval()
        for image, label in valid_dl:
            image, label = image.to(device), label.to(device)
            out = model(image)
            loss = criterion(out, label)
            total_valid_loss += loss.detach()

        scheduler.step()
        avg_train_loss = total_train_loss/len( train_dl )
        avg_valid_loss = total_valid_loss/len( valid_dl )
        loss_train.append(avg_train_loss)
        loss_valid.append(avg_valid_loss)
        print(f"Train Loss: {avg_train_loss}")
        print(f"Valid Loss: {avg_valid_loss}\n")
        if early_stopping.update_save_model(total_valid_loss, model):
            print("Early stopping")
            break
    return loss_train, loss_valid

torch.manual_seed(17)
model = FacePointModel()
# MSELoss as my loss function
criterion = torch.nn.MSELoss()
# Using Adam optimizer
optimizer = optim.Adam(model.parameters(), lr=0.001)
# Decay LR by a factor of 0.08 every 25 epochs
lrscheduler = lr_scheduler.StepLR(optimizer, step_size=25, gamma=0.08)
fit( 100, model, train_dl, valid_dl, criterion, optimizer, lrscheduler, device = 'cuda' )
After training for 100 epoch my models’s minimum validation loss was 2.01 and training loss was 1.95.
Testing
Next, I loaded my best saved model. tranfered it to gpu. For each Test images saved all 30 features. Then Using IdLookupTable.csv file outputted the required features of each image to output.csv. Then submitted the output.csv and got score 2.82481. This was the code used to submit.
index_to_column = [ str(col) for col in train_original.columns ]
model = FacePointModel()
model = model.to('cuda')
model.load_state_dict(torch.load("./checkpoint/best_model.pt"))
model.eval()
print(x_test.shape)
output = [dict()] # Submission test ImageID is 1 base, so the demo data
for i, test in enumerate(x_test):
    test = torch.tensor(np.asarray(test, dtype="float32").reshape((-1, 1, 96, 96))).to('cuda')
    out = model(test)
    temp = dict()
    for j, val in enumerate(out[0]):
        temp[ index_to_column[j] ] = float(val)
    output.append(temp)
print(len(output))

lookup = pd.read_csv('./dataset/IdLookupTable.csv')
print(lookup.head())
location = []
for index, row in lookup.iterrows():
    location.append(output[row['ImageId']][row['FeatureName']])

submit = pd.DataFrame( { 'RowId': lookup['RowId'], 'Location': location } )
submit = submit.set_index('RowId')
print(submit.head())
submit.to_csv('./output.csv')
Further Improvement
Although this model got moderate score, It could be further improved. Some of the ways are using bigger network ( ie. ResNet34 or ResNet50 ). Also for Image data, Augmenting is very useful tool to increase the dataset size. I could rotate each image by 15 to 20 degree CCW or CW. I could add some random noise to each image. I could mirror each image. The augmented images will also be used for training along with original image. This could improve my model accuracy. I will definately explore these in future.
